Wednesday, July 25, 2007
Pikelets
I used to make pikelets with my mum after school when I was little. She used to cook them with gee, which is clarified butter. Gee has all the flavour of butter, but doesn't burn, so it's perfect for cooking pancakes and pikelets. Serve pikelets with an absurd amount of double cream and you favourite jam.
1 cup self-raising flour
1 small pinch salt
1 tablespoon caster sugar
1 egg, lightly beaten
⅔ cup milk
30 grams melted butter
ghee or extra butter for frying
Place the flour, salt and sugar in a large mixing bowl. Make a well in the middle and add the egg. Gradually stir in the milk and melted butter. Beat until smooth.
Use a large spoon to drop the mixture into a buttered non-stick frying pan. Watch for small bubbles to appear on the surface and check to make sure underside is lightly browned.
Flip over and cook lightly on the other side.
Serve with lots of jam and double cream.
Monday, July 23, 2007
Chicken Noodle Soup
I love chicken noodle soup. It's perfect for those cold winter Saturday nights, or when you are sick in bed with the flu. Using homemade chicken stock makes all the difference in this recipe.
1 tablespoon olive oil
1 leek, sliced
1 clove garlic, chopped
2 carrots, peeled and sliced
1 stick of celery, sliced
1 litre homemade chicken stock
1 large chicken breast
100 grams of small pasta shapes or noodles
2 tablespoons parlsey, chopped
2 spring onions, finely sliced
salt and freshly ground black pepper, to taste
Heat the olive oil in a large pot, and gently fry the leek, carrot, celery and garlic until softened. Add the chicken stock and bring to the boil. Plunge the chicken breast into the soup and reduce heat to a low simmer. Simmer the chicken breast for around 5-7 minutes, or until cooked.
Remove the chicken breast from the soup and shred into small pieces, using either your hands, or a pair of forks. Return the chicken to the soup and bring back to the boil.
Add the pasta, and cook until al dente, before stirring in the parsley and spring onions. Taste, adding salt and pepper if necessary.
Serve in warm bowls with plenty of crusty bread.
Sunday, July 22, 2007
Risotto with Red Wine and Sausages
This rich risotto is real 'curl up on the couch with a glass of red' food - perfect for a cold wintery night in. Serve with a green salad if you feel the need.
4 Italian pork sausages (the ones with fennel are really nice)
2 tablespoons butter (NOT margarine)!
1 onion, finely chopped
300 g Aborio rice
¾ cup red wine
5 or 6 cups of chicken stock, kept hot
1 tablespoon finely chopped flat leaf parsley
salt and freshly ground black pepper
1 tablespoon of freshly grated Parmigiano
Skin the sausages, and heat a non-stick frying pan. Pinch small sections of the sausage into the pan. Fry gently until crusty and golden, then completely drain off the oil and keep in a warm place.
Melt the butter in a heavy pan, add the onion and cook until it softens. Add the rice and toss until well coated, stirring constantly. Add red wine and allow to bubble and be absorbed by the rice for 2 minutes, stirring.
Add half a cup of stock to the rice and stir until it is absorbed, over medium to low heat.
Add another half cup of stock and stir constantly but calmly with a wooden spoon until it is absorbed.
Continue for about 10 minutes.
Add the sausage pieces to the risotto and stir through, then continue the process of adding stock for another 10 minutes.
Start tasting the rice ti determine how much more time and stock is needed. Add the remaining stock a ladle-full at a time and cook for another 5 -10 minutes, until rice is cooked but not soft, and there is a general creaminess to the sauce.
When the rice is cooked, which will take 30-35 minutes all up, taste for salt and pepper, add parsley and parmigiano cheese, stir and cover. Bring to the table but leave for 5 minutes before uncovering.
Serve with a little extra grated Parmigiano on top.
Saturday, July 21, 2007
Chocolate Chip Chilli Cookies
This recipe comes from the recent Women's Weekly 'Cookies' cookbook. I must admit, the main reason I bought this book was for this recipe and it doesn't disapoint! The call for making candied chillies might seem like a complicated step, but the result is definitely worth it. These cookies are best eaten warm, while the chocolate is still warm and gooey.
For the biscuits:
250 grams butter, softened
1 teaspoon vanilla extract
¾ cup caster sugar
¾ cup bown sugar, firmly packed
1 egg
2 cups plain flour
¼ cup cocoa powder
1 teaspoon bicarbonate of soda
400 grams dark chocolate, coarsely chopped
For the candied chillies
¼ cup caster sugar
¼ cup water
4 fresh red thai chillies, finely chopped
First, preheat the oven to 180˚C and line two baking trays with baking paper.
Now make the candied chillies. Stir the sugar and the water in a small saucepan over heat until the sugar dissolves. Add the chilli and boil for 2 minutes. Cool and strain, discarding the syrup.
Now make the biscuits. Beat the butter, vanilla extract, sugars and egg in a bowl with an electric mixer until light an fluffy. Sift in the flour, cocoa and bicarbonate of soda in two batches. Then stir in the candied chilli and the chocolate.
Roll level tablespoons of the cookie dough into balls and place on on the baking trays about 5cm apart. Bake for about 12 minutes or until cooked and cool on trays.
Store in an airtight container.
Monday, July 16, 2007
Rich Almond and Chocolate Cake
This recipe is adapted from the classic Elizabeth David recipe. When you first take the cake out of the oven it will look perfect, only to sink in the middle and crack while it cools. Don't fret - it's normal! I like to dust the cake with icing sugar, rather than trying to hide the huge dent and cracks with icing. If, however, you're feeling like a failed cooked or you just want to impress, the cake looks fantastic with a pile of strawberries, raspberries and blueberries in the middle.
250 g good quality dark chocolate (I use Lindt 70%)
100 g ground almonds
150 g soft butter
150 g castor sugar
5 medium eggs, separated
Preheat oven to 180˚C, and grease and line a 23 cm round cake tin with greaseproof paper.
Melt the chocolate and the butter together in the microwave, being careful not to burn it, then mix in the sugar, almonds and egg yolks. Beat egg whites until they form stiff peaks. Add 1 tablespoon of the egg whites to the chocolate mixture and stir in well. Gently fold through remaining egg whites.
Spoon the mixture into the prepared tin and bake for 50 minutes, or until a skewer inserted into the centre comes out clean (although this cake is also delicious with the centre still gooey!). Allow cake to cool in tin for 15 minutes before transferring to a wire rack to cool completely. Serve with a dusting of icing sugar and plenty of double cream.
Friday, July 6, 2007
Chocolate Meringue Logs
I love making my own vanilla bean ice-cream, which uses an absurd number of egg yolks. This recipe is my solution as to what to do with the left over egg whites. The meringue logs are crisp on the outside and nice and chewy in the middle. I like to use a dark chocolate with at least 70% cocoa, to counteract the sweetness of the meringue.
3 egg whites
150 grams caster sugar
1 tablespoon cocoa
100 grams dark chocolate, melted
Preheat the oven to 120˚C and line two baking trays with baking paper.
Beat the egg whites until stiff. Add the sugar, one third at a time, beating after each addition until the sugar has dissolved. Fold through the cocoa.
Spoon the meringue mixture into a large piping bag, and pipe into logs approximately 10cm long the on the baking trays. Bake for approximately half and hour, or until crisp.
When cool, drizzle with the melted chocolate.
Pita crisps
We often go to Sydney road to stock up on Italian, Lebanese and Greek ingredients. The highlight is always the A1 bakery, where you can get a packet of the freshest, tastiest pita bread for around $1. Usually this is devoured in the car on the way home, however sometimes (okay, rarely), some manages to survive the journey home. This recipe is perfect for using up any stale pita bread you may have lying around, and works equally well on pita bread that has been frozen.
4 Pita breads
2 tablespoons Olive oil
2 cloves garlic, finely chopped
1 teaspoon dried oregano
sea salt flakes
Preheat the oven to 180˚C and line two baking trays with baking paper.
Pull the pita breads apart so that they form two circles, and tear the circles into rough chip shapes, placing them on the baking trays.
Combine the olive oil, garlic and oregano in a small bowl and brush onto the pita crisps. Sprinkle with the sea salt flakes and bake for approximately 5 minutes, or until golden and crisp.
Chicken Stock
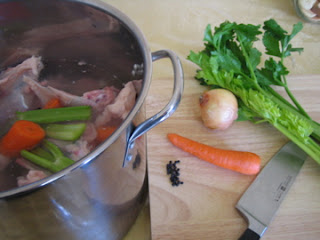
Nothing beats home made chicken stock for soups and risottos. Some people are scared off from making their own stock, thinking that it's either too hard or too time consuming. Well, it's not hard (in fact it's bloody easy) but it is time consuming - a good stock needs to simmer for several hours to develop a good flavour. Luckily the time involved requires bugger all effort on your part - unless you really want to watch a pot boil!
4 chicken carcasses
2 carrots , roughly chopped
2 sticks of celery, roughly chopped
6 black peppercorns
2 onions, peeled and halved
5 - 6 Litres water
salt, to taste
Place all the ingredients in a large stockpot, except for the salt, and cover with the water. Bring to the boil, skimming off any gunk that forms on the surface. Turn the heat down to very low and simmer for approximately 5 hours to concentrate the flavour of the stock. Taste the stock while it's hot, and add salt to taste (this could end up being quite a bit of salt - don't panic!).
Strain the stock and place in the fridge overnight. This solidifies the fat on the surface of the stock, making it easy to remove. The next morning, skim off the fat and pour the stock into containers and freeze. I like to use 1 litre milk cartons to store the stock in the freezer for use in soups, risottos, etc. and little plastic bags to store half cup quantities for all those times when you need just a little stock.
Gnocchi
Gnocchi is a tricky little dish with everyone having a different opinion as to how it should be made. Gnocchi should be light and fluffy, not dense and heavy. It should melt in your mouth and make you feel all warm and fuzzy, it should not make you feel as though you have indigestion! Through much trial and error, I have discovered the secret to the perfect gnocchi. Firstly, you must use the right potato. Toolangi delights are perfect if you can get a hold of them, if not, use desiree. Secondly, the potatoes should be baked, rather than steamed or boiled. Boiling or steaming the potatoes adds extra moisture, which results in dense, heavy, evil gnocchi. Finally, the potatoes should be passed through a potato ricer rather than being mashed, as mashing the potatoes also results in dense, heavy evil gnocchi. If you remember these rules (and don't cheat!), you will end up with beautiful, light, fluffy, heartbreakingly good gnocchi.
1 kg potatoes, such as Toolangi delights or desiree
1 teaspoon salt
1 egg
200 - 300 grams flour
extra flour for dusting
Bake the potatoes in their skins until just tender, then cool and peel. Pass the potatoes through a potato ricer onto a large board and then spread out. Cover the potatoes with 200g of flour and then tip on the egg. knead the potatoes, flour and egg into a firm dough. If the dough is too sticky and won't hold its shape add a little extra flour. Take a small amount of the dough and roll into a long thin log around 1.5 cm thick. Cut the log into small pieces around 2-3 cm long. Repeat with the remaining dough. You can shape the gnocchi with the traditional little ridges by using either a gnocchi board or a fork. Drop the gnocchi in batches into boiling salted water. They are ready when the float to the surface. Remove the gnocchi with a slotted spoon and toss with desired sauce.
Subscribe to:
Posts (Atom)